Showing posts with label handmade. Show all posts

Sunday, December 8, 2013

Cold Weather = Harlequin Hoodie

I have seen the pattern for the Harlequin Hoodie many times as well as on Ravelry. After looking at it I decided to make this. I figured it would be perfect for the upcoming cold weather over the Thanksgiving week. All the yarn used was from my stash probably all Red Heart which worked out really well because I didn't have to spend any money. Of course I didn't have it finished by then but it's complete now just in time for the next snap of cold weather.

                                  
I am happy with the way it turned out. I did add ch stitches to the hood as well as the cowl and added a few more rows to the hood so that it would be more oversized vs close fitting. I also tappered it off in the back with decrease rows so it would be sort of rounded instead of square. If I make another one I will follow the pattern exactly and make in a solid color except for the edging rows. And use a differnt type of yarn. Looking foward to wearing it soon.

THANKS FOR STOPPING BY.....HAVE A GOOD DAY!!!

Monday, November 18, 2013

Christmas Stocking & More...

I haven't posted in awhile but that doesn't mean that I haven't been crafting. I've been also trying to get back into taking surveys which in the end can help fund my projects. Lately I have gotten back into baking...cream cheese pound cakes have been in the cake plate a lotaround here. I started slippers for my son...still need to attach the sole on one. I've also been drawn to those darn African flower hexagons and started a blanket using them in shades of blue and green.

I'm trying to attach along the way as well as sew in or crochet in the ends so I won't be stuck with that daunting task in the end. I don't know how big it will be I plan to go until the yarn runs out. I want to start a pair of these slipper boots in gray and cream with maybe a hint of blue- green color.


I saw these on the Cozy Made Things blog and really liked her take on the slippers. The original pattern uses less hexagons for a short slipper but I like the taller version. I originally bought some plastidip to put on the bottom but after further research I also bought a roll of jute that I will use for the bottoms. This way I can wear them out the house if I please. I was going to go this alone but I found a pattern on for crochet soles - turning slippers into street shoes, which I think will be very helpful.

After going through my stash, even taking yarn from other projects (rainbow puff stitch blanket) I decided I wanted a hoided scarf. I refuse to buy what I can make and this time went with the Harlequin Hoodie on Ravelry.

African Flower Christmas Stocking

After making African flowers for the blanket I thought this would make a unique Christmas stocking. There is a Etsy shop that sells a pattern but I figured this was one of those things I could figure out on my own. I used this pattern for the Polka Dot Christmas Stocking to help piece the motifs together.

I attached them differently at the toe and took out two motifs from the toe as well as a full row at the top of the stocking. Instead I added half hexagons to make a straight edge along the top and some rows of single and double crochet. I liked the finished product and decided to list this in My Etsy shop.

Friday, October 18, 2013

Nacho Baby's Typical Blanket


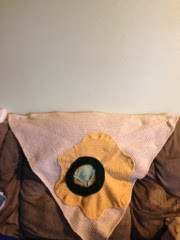
I had an interesting request for a custom order baby blanket. A nacho chip including the cheese and a jalapeño. All I knew is that the chip needed to be a triangle shape and a slight idea of how to do the rest. I could not find any patterns anywhere for a jalapeño slice so I had to figure it out and go from pictures. In two weeks time this is what I came up with. 
 

Thanks for looking......T. Mitchell 

Friday, October 4, 2013

Colors, Colors, and More Colors....

I'm just a few strands away from finishing the Sunburst Granny blanket. That means its time to start another project. Once it's done I will post updated pictures of the finished product. There are so many things that I want to do next...blankets, sweaters, coats,hats. I have a lot of different colors to use so I was looking for a stash buster that would use up some of the yarn I have so when I buy more I won't fell bad :/ and so I can continue to build my blanket stash. These are the colors that I want to use to work with.
Colors I want to use in next blanket
These are ten skeins from my stash. Some have never been used and others are partials. I have frogged three blankets before remembering that I saw this at Petunia Pill's BlogSpot. I couldn't pass this one by.
 
photo
On her website she gives a how-to for this blanket. So far I'm happy with how it is turning out. Since this picture I've added 5 more rows. I started using a smaller hook a size H I think but the "puff's" weren't puffing out like they should so I switched to a size K and it's looking good I think.
 

Puff Stitch Started


Thanks for stopping by...have a wonderful day,
 
                  T. Mitchell


Monday, September 23, 2013

Crochet Quilt Finished

I finally finished the crochet quilt and it is off to it's new owners. I hope they like it. 

I think it came out pretty good and I want to make myself one; with different colors. I don't know how long it took to hand stitch the binding to the blanket because I was watching tv and stopping. I like not being able to see the stitching. I can say stitching to the crochet side was a bit tricky because you had to make sure you were catching the thread onto something to hold. 


Thursday, September 19, 2013

Updates...Sunburst Grannies & Crochet/Fabric Blanket

Update 10/7: The sunburst granny blanket is complete. 
I chose not to block it because I liked the way it looked in its natural finished shape.  I did a few rows of hdc around the edges and finished with a picot edge. It's now for sale in my etsy shop. 

Thanks for stopping by.... T Mitchell


Update 9/23: All the Sunburst granny's are done. I laid them out today to see how I wanted to piece them together. Some of the toes came out different as some of the squares got mixed up. So far the rows have been joined horizontally with a slip stitch and now working on joining the other way.

Progress has been made on both the Sunburst Granny Squares and the crochet blanket with fabric on the back. I debated whether to complete the fourth round on the granny squares separately or join as I go. I decide to do them separately using white yarn for the fourth round.
I used the tutorial from Nittybits blog- as mentioned in the original post about this topic. Additionally I added a fifth round of single crochet in each stitch across with three sc in the corners. I have four more squares to go- 42 total them I can begin to join them. I plan to do six rows of seven and I think I will use the flat single crochet method to join and see how it looks. If I don't like it I will use the slip stitch method. Still debating what type of border I will go with. 

I have made my binding for the crochet and fabric blanket. Since I wanted a wider binding I cut more strips to make a continuos strip and zig zig stitched them together with the sewing machine. I pinned it to the crochet quilt and proceeded to sew it with my sewing machine. 
After sewing for a few. I liked the way the fabric side looked but not the back side since I tried to do both sides at once. So after a few attempts I ripped out the seams and began to hand stitch the binding instead. 
Hand sewn quilt binding
If I would have done this in the beginning I think I would have been done but I thought it was going to be much harder than it really is. I watched multiple YouTube videos and read many tutorials to see how to do this. I found the instructions at the blog Stitched-together on how to hand see a quilt binding very very helpful. I still have the back side to go. So far it seems to be going ok. Me being my worst critic there are some spots that I want to go back and redo.

Again, thanks for stopping by........ T. Mitchell

Monday, September 16, 2013

Crochet and Fabric Baby Blanket

So I made progress with attaching the fabric to the crochet blanket. 
I think it came out very nice and I really like my fabric choice. I first did a 1/4 inch seam around the fabric and then attached it with the sewing machine. I did not make the fabric too tight so if the crochet side is stretched then it would have some give. I attempted to attach a binding using the circle fabric- mentioned and pictured in previous post. I cut a 2 1/2 inch strip and preceded to attach it but for me it looks way too small especially on the crochet side. So I painstakingly removed what I had already sewed and cut more strips. I plan to attached the two sets of strips that I've cut to make one wide piece of binding then attempt to attach it to the blanket again. Hopefully this time I'll have better results.....

Thanks for stopping by!

Thursday, September 12, 2013

Next Crochet To-Do....

So I've always wanted to make a blanket with crochet on one side and fabric on the other. I had this idea a very long time ago and never got around to it but of course like everything else when I looked more into it someone had already done it. Well that made my life somewhat easier because now I know what and how to do it and that it will work. I finished the blanket which is done in single crochet and purchased some fabric for the backing. 
This is a gift for parents of a new baby. Originally no one knew the sex of the baby so I figured the red and the circles could go either way. Since it took me I long to finished this blanket, thanks to my sewing machine, the couple had the baby, a girl- which prompted me to purchase more fabric. So now I will use the colorful paisley and flower material for the backing and the circles for the binding. I thought about crocheting a border but I figured a fabric binding would be different. I finally got a new sewing machine since the Pfaff I have would not cooperate. After attempting to fix it on my own with the help of YouTube- it would work fine then the needle would hit the bobbin housing and brake. I think the timing is off. It's old and one day I think I'd like to get it repaired.  Ive been putting this blanket off to try and get some other things done but maybe today I'm will break out my new Brother and work on it.  

Wednesday, August 28, 2013

Retro Circles finished

I've finally finished the Retro Circles crochet blanket that I came across from the blog Three Peas in a Pod Handmade. I am happy with the way it came out. I added a double crochet border in which I found the instructions on Crochet with Raymond. I think that I will definitely make another one of these and I have a ton of color combos in mind. For some wired reason it seems that my corners were a little wider than I'd liked maybe next time I won't chain two in the corner and do one instead. It was hard to decide whether to block or not. In the end I did lightly block the blanket mainly do to the corner issues and I wanted it to feel a little softer. I carried most on my ends so I only had a few ends to weave in.


I'm thinking of making this in a queen size and adding a quilt backing for my bed....we'll see. I have so many other ideas of blankets that I want to make and a large yarn stash that I need to get rid of.

Thanks for visiting,

          T. Mitchell